Scenarios
Before using OMS to create a migration task, you need to create two execution nodes in the OMS cluster for listing and migrating source objects.

Multiple execution nodes can be created in a cluster.
Prerequisites
You have started the OMS plugin by referring to Starting the OMS Plugin.
Constraints
- The execution nodes can be x86-64 servers but cannot be Arm servers.
- CentOS 7.6 is recommended for the execution node servers.
- The execution node servers must have at least 4 vCPUs and 8 GB memory and must be in the same VPC and security group as the server with RDA installed.
- Ports 22 and 8080 must be enabled on the execution node servers.
- The execution nodes must be in the same VPC and security group as the destination.
- For a NAS migration, the execution nodes must be able to access the Internet, so that the required tools nfs-utils and rng-tools can be installed.
- Execution nodes must have higher specifications if you choose the NFS MOUNT migration method. It is because using this method, paging listing is not supported and loading source data occupies too much memory of the execution nodes. The migration method using protocol-based direction connections is recommended.
Procedure
- Double-click the RDA icon on the desktop or RDA.exe in the installation directory to start the RDA client. Enter the username and password to log in to the RDA console.
- In the navigation pane on the left, choose OMS > Configuration > Cluster Management.
- On the displayed page, click Add Nodes.

- Set the parameters for creating an execution node according to Table 1. Click Add Node to create execution nodes in a batch.
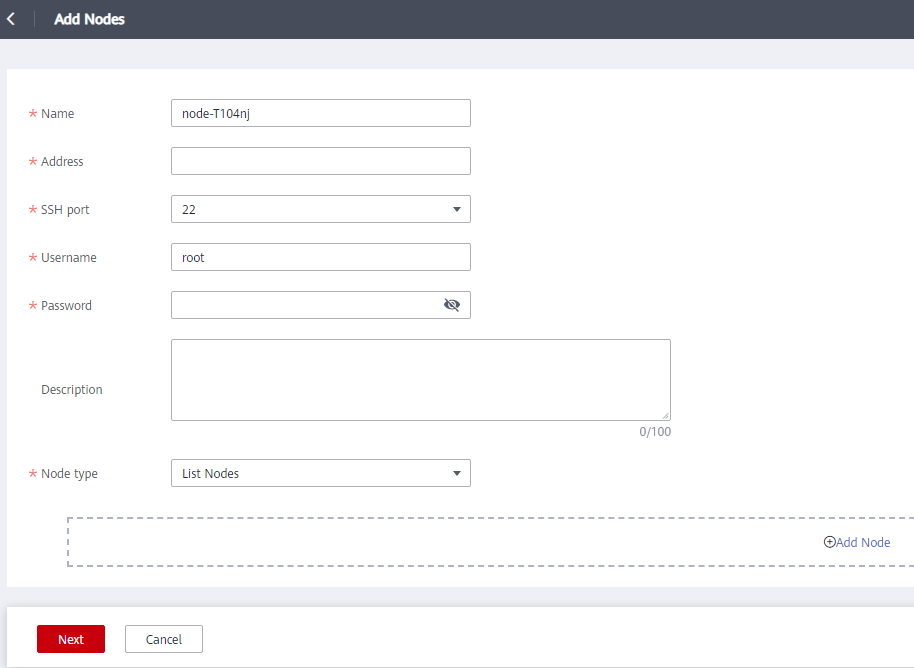
Table 1 Parameters Parameter
Description
Name
User-defined
Address
IP address of the server where the execution node is to be installed.
NOTE:Ensure that the server where the execution node is installed can communicate with the server where RDA is installed.
SSH Port
22
Username
User name for logging in to the server where the execution node is installed using SSH.
NOTE:If you use a private line for migration, use the root account.
Password
Password for logging in to the server where the execution node is installed using SSH.
Description
User-defined
Node Type
Select List node or Migration node. A list node is used to perform the listing action, and a Migration node is used to perform the migration and comparison actions.
A cluster can contain multiple list nodes and migration nodes.
CAUTION:A migration task can be created only when there are at least a list node and a migration node in the cluster.
- Click Next. After confirming that the configuration is correct, click Confirm. The execution node starts to be installed. When the status changes to Online, the execution node is installed and available.
For details about the node statuses, see Table 2.
Table 2 Node statuses Status
Description
Offline
The node is unavailable.
Online
The node has been installed and is available.
For details about node deployment statuses, see Table 3.
Table 3 Node deployment statuses Deployment Status
Description
Not deployed
The node is waiting for deployment.
Deploying
The node is being deployed.
Deployed
The node is deployed.
Deployment failed
The node fails to be deployed.
Deleting
The node is being deleted.
Deletion failed
The node fails to be deleted.
Follow-Up Operations
You can perform the following operations on the nodes that are successfully installed.
Operation |
Description |
|---|---|
Deleting a node |
|
Redeploying a node |
Locate the target node and click Redeploy in the Operation column. |